Lesson Plans
A one-time, 90-minute workshop for ages 7–12, plus a four-session course for grades 3–6. Plans for middle and high school students are coming.
Fun, not academic
There are no tests, quizzes, or grades. Kids learn by building something, launching it, and changing one thing to see what happens. We talk about the science in short, story-sized pieces, then get right back to building. Every child keeps a Launch Log (a place to brag about their best shots, not homework), and the four-session course ends with a Launch Day, show-and-tell, and a fun award for everyone.
The five big ideas (in kid language)
- Levers: a long arm on one side of a pivot swings faster than the short side.
- Stored energy: a raised weight is “stored-up push”. When it falls, that push goes into the arm.
- Slings: a sling makes the arm “longer” and whips the ball faster, like a flick of your wrist.
- Angles: when the ball lets go changes how high and far it flies.
- Fair tests: change one thing at a time, and you’ll know what made the difference.
The one-time workshop: Build & Launch a Trebuchet (90 minutes)
Our main plan for library and drop-in workshops. Every child builds a desktop trebuchet, launches it, runs one experiment, and takes it home, all in a single 90-minute visit. No experience needed.
| Who | Ages 7–12, mixed ages in one group (younger kids welcome with a grown-up). Up to 15 kids. |
|---|---|
| Where | A makerspace or meeting room with 3 tables, plus a hallway or open floor at least 20 ft long for launch lanes. |
| Grown-ups | 3 instructors and helpers (about 1 for every 5 kids). Families are welcome to stay and help. |
| Take home | A working desktop trebuchet, a bag of counterweight washers and soft ammo, a Launch Log and a family note. |
Set up the room Prep
- Arrive 45 minutes early. Cover 3 build tables with kraft paper; put out kits, slings, cups, washers and markers in one tray per table.
- Tape 2–3 launch lanes (see room setup): a start line and a mark every foot to 20 ft. Put a hula hoop and a bucket in each lane.
- Tape a spectator line for families behind and beside the launchers, never in front.
- Hang a “What made the biggest difference?” poster with three columns: counterweight, sling length, ammo.
- Test-fire the demo trebuchet and one kit from the box.
Welcome & goggles Share
- Name tags and goggles as kids arrive. Seat them at tables in groups of about 5; each child builds their own machine, and tablemates help each other.
- Quick question: “What’s the farthest you’ve ever thrown something?”
Story & demo: castle-busting machines Share
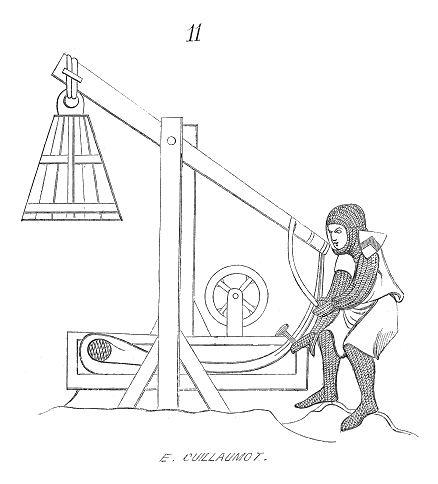
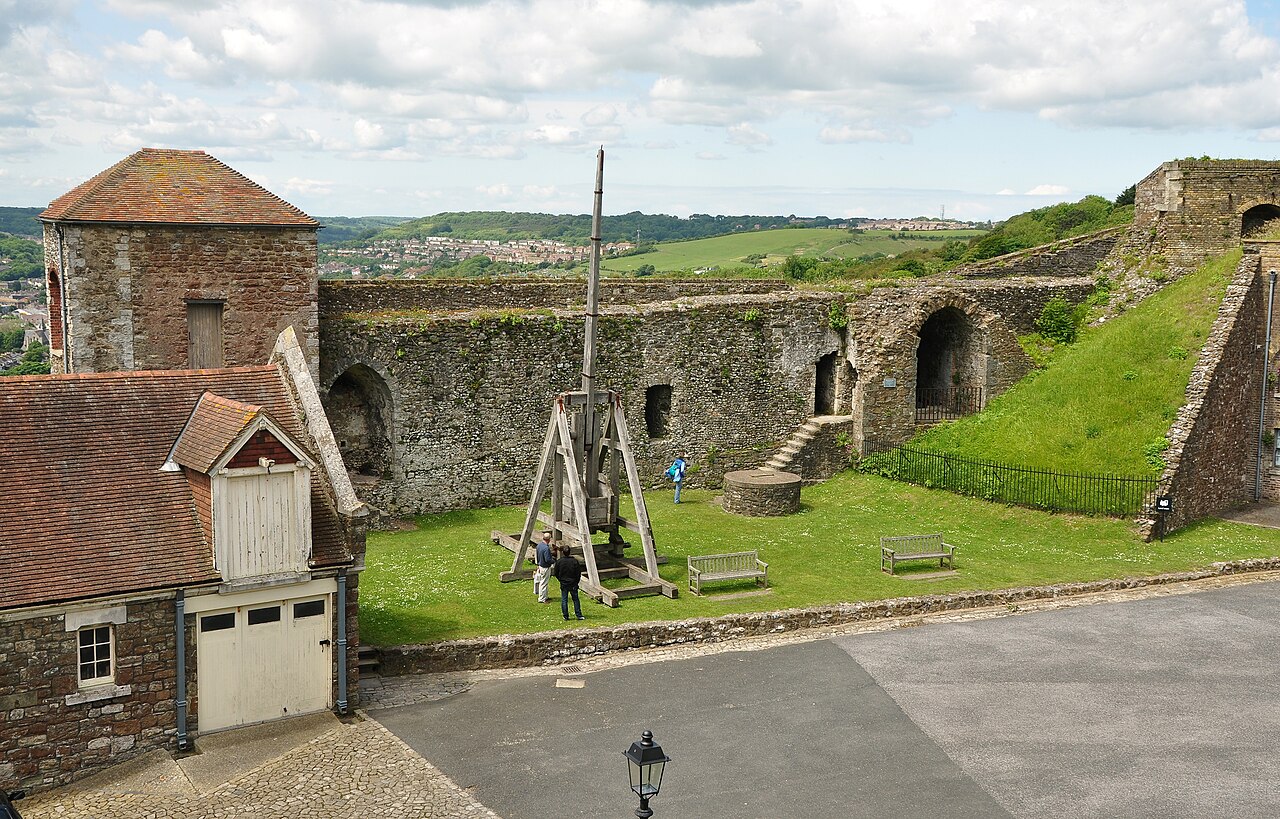
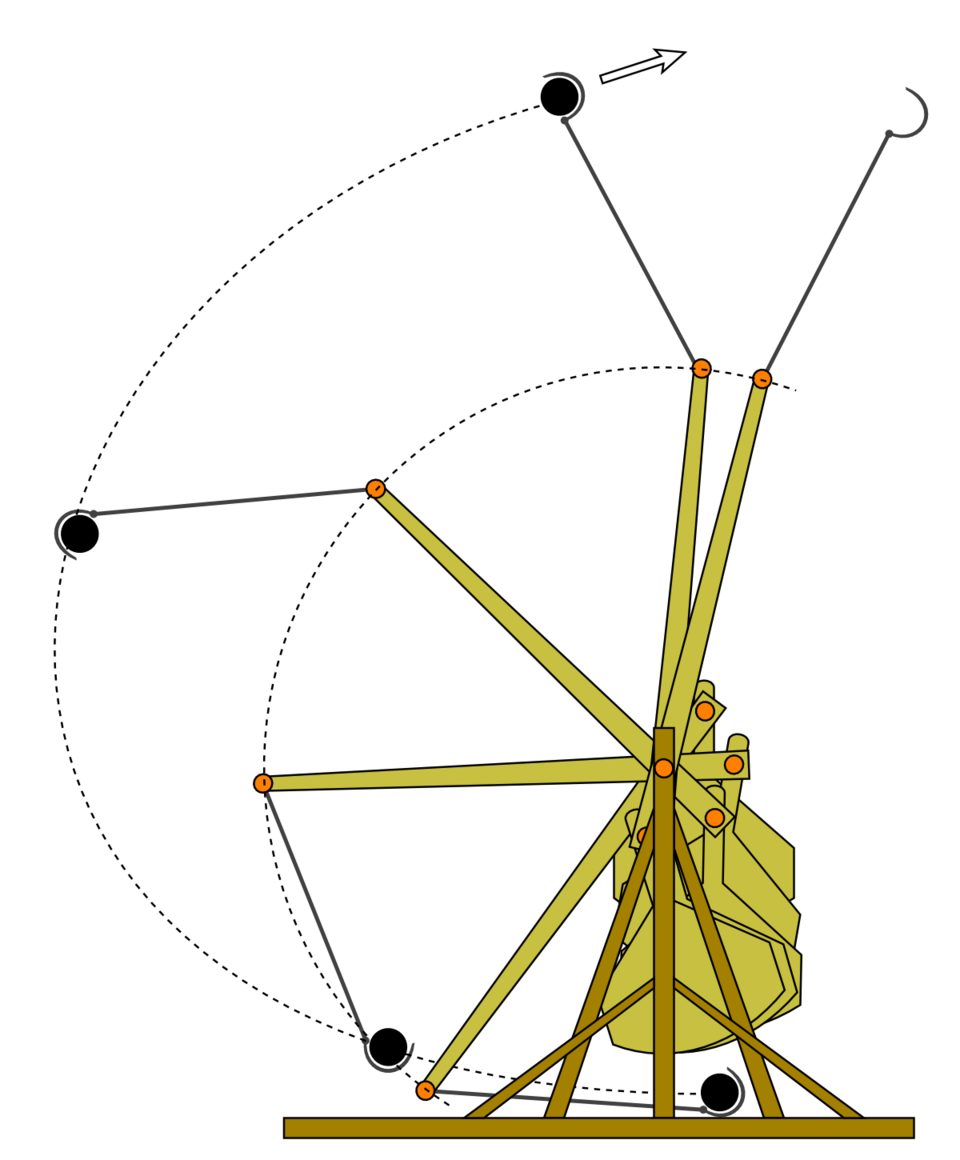
- Show the drawing from about 1230 and the real-size trebuchet at Dover Castle. Castles had thick walls, so engineers built giant machines that used a falling weight to throw rocks over them.
- Demo: launch a ping-pong ball with the finished trebuchet. Ask: “What made it move? Nobody pushed it!” (The falling weight did.)
Launch Rules Hands-on
- Go through the five Launch Rules.
- Practice the countdown together: “Lane clear?” → “Lane clear!” → “3, 2, 1, LAUNCH!”
Lever flick Hands-on
- Each table gets a ruler and a pencil. Balance the ruler on the pencil, put a pom-pom on one end and tap the other end.
- Move the pencil closer to the tapped end. Does the pom-pom fly higher?
Discovery we’re after: a small push on the short side makes the long side move fast. That’s how the trebuchet arm works.
Build your trebuchet Hands-on
Frames come pre-assembled (base, uprights and axle) so there’s time to launch. Kids finish the moving parts:
- Arm: slide the arm onto the axle, short end toward the back. Check that it swings freely.
- Counterweight cup: hang the small cup from the short end and drop in 5 washers.
- Release pin: press the pin into the tip of the long arm, angled slightly forward.
- Sling: tie the sling’s fixed string to the arm tip; slip the loop on the other string over the pin.
- Decorate the base with markers and stickers (a coat of arms) and write your name on it.
- Safety check: an adult checks every machine (arm swings, loop slips off the pin, goggles on) and gives it a “Ready to launch” sticker.
First launches Hands-on
- Teams of 2–3 take turns at the lanes with 5 washers and a ping-pong ball.
- Each child launches 3 times; a teammate spots where it lands. Write the best distance in the Launch Log.
- Troubleshooting: if the ball flies straight up or backward, bend the pin a little more forward; if it dribbles out, bend it back.
Change one thing Hands-on
- Each child picks one change: more or fewer washers (3 / 7 / 10), a longer or shorter sling, or a different ammo (pom-pom, ping-pong ball, bean bag).
- Launch 3 more times and compare with the first result.
- Everyone adds a sticky note to the poster: “I changed ___ and it went ___.”
Fair test: change only one thing at a time, so you know what made the difference.
Target challenge Hands-on
- Use your best setup to land in the hula hoop, then the bucket.
- Older kids can “call the shot”: predict the distance first, then launch.
Share & take home Share
- Read the poster together: what made the biggest difference?
- Everyone gets a fun award sticker. Machines go home in a bag with 10 washers, two pom-poms, the Launch Log and the family note.
- Hand out “Get on the list” cards for future workshops and events.
If time runs short: skip the lever flick and do the target challenge as one round. If there’s extra time: an ammo showdown (which flies farthest: pom-pom, ping-pong ball or bean bag?) or a whole-group “longest flight” final.
Talk It Over
- What made your trebuchet move without anyone pushing it?
- What was your one change, and what happened?
- If you built a giant one, what would you launch? (Pumpkins!)
For ages 7–8 and mixed groups
- Pre-tie the slings, so younger kids only slip the loop on.
- Pair a younger child with an older “engineering buddy” or their grown-up.
- For the experiment, just ask “farther or shorter?” rather than measuring.
Helper roles
- Lead: runs the story, rules and timing.
- Lane boss: stays at the launch lanes and calls “Lanes are clear!”
- Builder: floats between tables, fixes jams, does safety checks.
- Keep 3 spare kits and a few pre-tied slings in a “pit stop” box.
Bring (for 15 kids)
- 15 trebuchet kits with frames pre-assembled + 3 spares; a finished demo trebuchet
- ~250 same-size washers, 20 small cups, 20 slings (felt pouch + strings) and release pins
- Ammo: 30 ping-pong balls, 20 mini bean bags, a bag of large pom-poms
- 18 kid-size goggles, 3 tape measures, masking tape, 3 rulers, pencils
- 2–3 hula hoops and buckets, kraft paper, markers, stickers, sticky notes, the poster
- Name tags, Launch Logs, family notes, award stickers, take-home bags, “Get on the list” cards, a first-aid kit
Before the day: confirm the room and a 20-ft launch lane with the library; agree on registration limits and ages; ask about the library’s photo policy (we only take photos with a parent’s permission); and print kits at least two weeks ahead so there’s time to test and fix them. Afterward we note attendance, how many machines went home, and any feedback cards; no tests or surveys.
Safety & room setup
The five Launch Rules (practice them in Session 1)
- Goggles on whenever anything is loaded or launching.
- Soft ammo only: ping-pong balls, bean bags, and pom-poms only. Nothing else gets launched.
- “Lane clear?” → “3, 2, 1, LAUNCH!” Nobody stands in front of a machine. The whole team counts down together.
- Hands off the arm once the counterweight is loaded. Hold the release, not the arm.
- Collect ammo only when an adult calls “Lanes are clear!”
- Build tables: one per team of 3, covered with kraft paper (kids can sketch on it).
- Launch lanes: in a hallway or the gym. Tape a start line, then a masking-tape mark every foot out to 20 ft (label every 5 ft). Two or three lanes side by side, at least 4 ft apart.
- Target zone: a hula hoop, a bucket, and a paper bullseye taped to a cardboard box.
- Parking lot: a shelf or bin where machines are stored between sessions, labeled with each team’s name.
- Tools: kids use screwdrivers, scissors, and rulers. Adults handle hot glue, drills, and any cutting.
Materials for the whole course (15 kids, 5 teams)
| Item | Amount | Notes |
|---|---|---|
| Desktop trebuchet kits (3D-printed base, uprights, arm, and pin) | 15 (one per child) + 2 spares | About $5–10 each in filament and hardware. Printed ahead by our team |
| Wooden dowels or bamboo skewers (axles), small screws, rubber bands | 1 bag each | |
| Washers (counterweight) and small paper or plastic cups | ~300 washers; 20 cups | Same-size washers make counting easy |
| String and fabric scraps or felt (for slings) | 1 spool; a handful of scraps | Pre-cut 2″×2″ pouches save time |
| Popsicle sticks (jumbo), plastic spoons, rubber bands, binder clips | 1 box each | For the Session 1 quick catapult |
| Ammo: ping-pong balls, mini bean bags, pom-poms | Plenty (about 60 ping-pong balls, 40 bean bags, a bag of large pom-poms) | The only things we launch |
| Safety goggles (kid size) | 18 | Kids keep wearing them all course |
| Tape measures, masking tape, rulers, protractors | 5 each; lots of tape | |
| Hula hoops, buckets, cardboard box with a paper bullseye | 2–3 of each | Targets |
| Launch Logs, name tags, markers, stickers, award certificates | Printed per child | See Printables |
| One finished “Small Yard” (12–18 in) trebuchet + (if possible) the “Big Yard” (3–4 ft) trebuchet | 1 each | For demos (Sessions 1 and 4) |
Session 1: Meet the Siege Engines
Levers and the history of throwing machines, plus two builds: a quick catapult and the start of a trebuchet.
Welcome & teams Share
- Name tags and goggles for everyone. Make teams of 3 (mix ages and friends).
- Each team picks a castle-y team name (the “Pumpkin Knights”?).
- Quick question to the room: “What’s the farthest you’ve ever thrown something?”
Story time: throwing things before gunpowder Share
- Show pictures: a drawing from about 1230 and the real-size trebuchet at Dover Castle.
- Tell it as a story: castles had thick walls, so engineers built giant machines that used a falling weight to throw rocks over them.
- Demo: launch a ping-pong ball with the finished “Small Yard” (12–18 in) trebuchet. Ask: “What made it move? Nobody pushed it!”
Launch Rules drill Hands-on
- Go through the five Launch Rules.
- Practice the countdown as a whole class: “Lane clear?” → “Lane clear!” → “3, 2, 1, LAUNCH!”
Lever lab: the ruler seesaw Hands-on
- Each team balances a ruler on a pencil (the fulcrum).
- Put 3 washers on one end. How many washers balance it on the other end? Now move the pencil closer to one end and try again.
- Flick test: put a pom-pom on the long end and tap the short end. Move the pencil. When does the pom-pom fly highest?
- Kids record their best “flick” in their Launch Log.
Discovery we’re after: a light tap on the short side makes the long side move fast. That’s exactly how a trebuchet arm works.
Quick build: popsicle-stick catapult Hands-on
- Stack 7 jumbo sticks and rubber-band both ends (the base).
- Rubber-band 2 more sticks together at one end only (the arm), then slide the base between them.
- Tape or rubber-band a plastic spoon to the top stick.
- Launch pom-poms and ping-pong balls down the lane. Try moving the base stack closer to the rubber-banded end. Farther or shorter?
- This one is theirs to take home on Launch Day, and it’s our “cousin” machine: it stores energy by bending, not by lifting a weight.
Snack break Break
Trebuchet build, part 1: the frame Hands-on
- Hand out a kit to each child (everyone builds their own, and teammates help each other).
- Press or screw the two uprights into the base. Check that they stand straight with a “square” (the corner of an index card).
- Slide the axle through the uprights and make sure it turns freely.
- Write your name on the base and decorate it with markers or stickers (a coat of arms!).
- Park the machines in the team bin.
Clean up & one cool thing Share
Every team says one cool thing they discovered today. Teaser: “Next week your trebuchets fly!”
⏱If time allows (some classes run to 4:45): Decorate your trebuchet base with a team coat of arms, or run a catapult “longest flight” contest.
Talk It Over
- Why did moving the pencil change how high the pom-pom flew?
- Where did the catapult’s “push” come from?
- Why would castle-builders care about levers?
For 4th graders and first-time builders
- Pre-assemble the catapult bases so they only add the arm and spoon.
- Skip counting washers and just ask “more or fewer?”
- Pair each 4th grader with a 5th or 6th grade “engineering buddy”.
Helper tips
- One adult runs the launch lane, and two float between tables.
- Check that the rubber bands aren’t too tight on the catapult (snapping sticks).
Bring
- Rulers, pencils, washers, popsicle sticks, spoons, rubber bands, pom-poms, ping-pong balls
- Trebuchet kits (frames), markers, stickers, goggles, name tags, Launch Logs
- A finished “Small Yard” (12–18 in) trebuchet for the demo
Session 2: Build It & First Launches
Stored energy, finishing the trebuchets, and the first real experiment: more counterweight.
Stored-energy demo Share
- Hold a cup of washers low, then high. “Which one has more ‘stored-up push’?” Drop both onto a pillow and compare the thump.
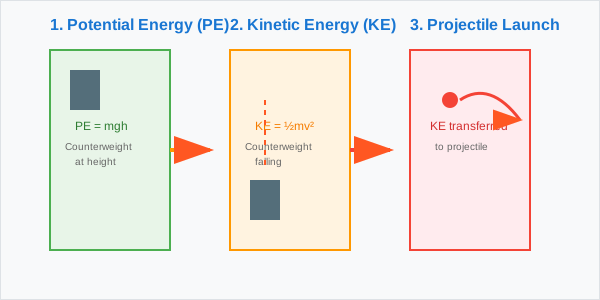
- Show the energy picture below: lifted weight → falling weight → flying ball.
Trebuchet build, part 2: arm, counterweight & sling Hands-on
- Arm: slide the arm onto the axle. The short end is for the counterweight, the long end for the sling. Check that it swings freely.
- Counterweight bucket: hang a small cup from the short end with string or a paper clip.
- Release pin: press the bent wire or 3D-printed pin into the tip of the long arm, angled slightly forward.
- Sling: tie a 6″ string to each side of a felt pouch. Tie one string firmly to the arm tip. Make a small loop at the end of the other string; it slips over the release pin.
- Trigger: hold the arm down with a finger (or a pencil through a hole in the frame). Letting go = launch.
Grown-up safety check Hands-on
An adult checks every machine: axle secure, arm swings freely, sling loop slips off the pin, goggles on. Then it gets a “Ready to launch” sticker.
Snack break Break
First launches! Hands-on
- Take the machines to the launch lanes. Start with 5 washers and a ping-pong ball.
- Each child launches 3 times. Teammates spot where it lands and read the tape marks.
- Record the distances in the Launch Log. Celebrate the first flights!
- Troubleshooting: if it flies backward or straight up, the release pin needs bending (forward = later release, lower flight).
Experiment: how much counterweight? Hands-on
- Make a prediction together: “If we double the washers, will it go twice as far?” Write the guesses on the paper tablecloth.
- Each team tests 3, 5, 7, and 10 washers, with 2 launches each, keeping everything else the same (a fair test!).
- Fill in the counterweight chart in the Launch Log (a simple bar chart with stickers works great).
- Look for the “too much” point: does the machine tip, jump, or throw wildly?
Share & park Share
Each team shows its chart. Did doubling the weight double the distance? (Usually not quite, and that’s a great puzzle.) Park the machines.
⏱If time allows (some classes run to 4:45): Try 12 or 15 washers (carefully!) to find the “too much” point, or start testing sling length early.
Talk It Over
- Where does the trebuchet’s energy come from?
- Why is the long arm on the throwing side?
- What happened when we added lots of washers?
For 4th graders and first-time builders
- Pre-tie the slings, and let kids thread only the pin loop.
- Use colored tape zones (“red zone, blue zone”) instead of feet.
Helper tips
- Most first-launch problems come from the sling loop sticking on the pin. Smooth or bend the pin.
- Keep the spare kits ready for any broken parts.
Bring
- Arms, pins, cups, string, felt pouches, washers
- Masking tape and tape measures for the lanes; “Ready to launch” stickers; chart stickers
Session 3: Tune It Up
Sling length, release angle, and ammo showdowns, plus target practice and meeting the catapult’s cousins.
The fair-test trick Share
Mini-demo: change the counterweight and the ammo at the same time. “So which one made it go farther?” Nobody can tell! That’s why engineers change one thing at a time. Today we tune three things, one at a time, at three stations.
Station A: sling length Hands-on
- Keep the washers at your team’s “best” number from last week.
- Try slings of 4″, 6″, and 8″ (pre-cut strings with loops), with 2 launches each.
- Record them in the Launch Log. Which sling length is the champion for your machine?
Discovery: a longer sling acts like a longer arm, so it’s faster, up to a point. Too long and it drags on the table or lets go at the wrong time.
Station B: release angle Hands-on
- Gently bend the release pin: straight up, a little forward, and more forward (adults help).
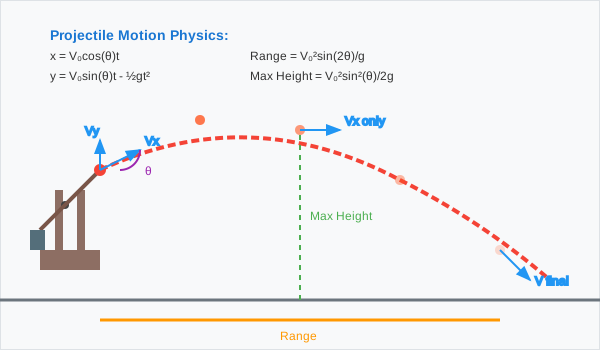
- Watch the flight path: high rainbow or low line drive? Which goes farthest?
- Use a protractor to measure the launch angle roughly (a partner can film in slow motion on a phone).
Snack break Break
Station C: ammo showdown Hands-on
- Same machine and settings. Launch a pom-pom, a ping-pong ball, and a mini bean bag, twice each.
- Rank them farthest to shortest in the Launch Log. Surprised? (Very light things get slowed by the air; heavier things need more “push” to get going.)
Target practice Hands-on
- Set up a hula hoop, a bucket, and the paper bullseye box at different distances.
- Teams choose their settings to hit each target. Can you predict where it will land before you launch?
Meet the cousins: catapult, slingshot, ballista Share Hands-on
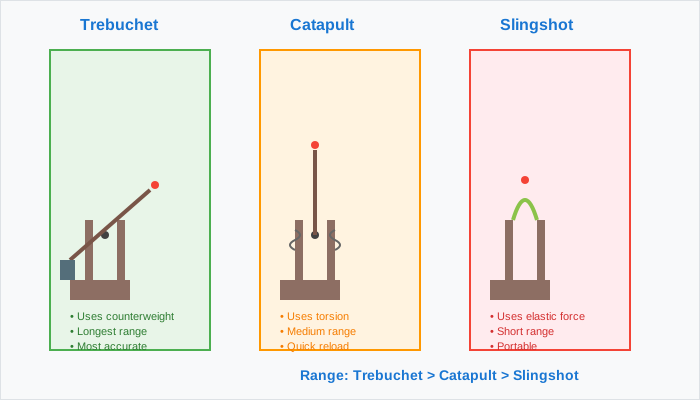
- Quick side-by-side launches: the popsicle-stick catapult (bending), a tabletop slingshot (stretching rubber band), and the trebuchet (falling weight).
- Which is most powerful? Most accurate? Easiest to aim?
Lock in your Launch Day settings Share
Each team writes its “secret recipe” (washers, sling, pin) on a card and tapes it to the machine.
⏱If time allows (some classes run to 4:45): Build a tabletop slingshot from a Y-shaped stick or craft sticks and rubber bands, and compare it to your trebuchet.
Talk It Over
- Why does changing only one thing at a time help?
- Which change made the biggest difference for your machine?
- Why might castle defenders prefer a catapult over a trebuchet?
For 4th graders and first-time builders
- Run only Stations A and C. Adults pre-set the pin angles.
- Targets close in, with big hula hoops.
Helper tips
- One adult per station, with teams rotating every 15–18 minutes.
- Keep the ammo sorted in labeled bins so the tests stay fair.
Bring
- Pre-cut 4″/6″/8″ slings, pliers (adult), protractors, pom-poms, ping-pong balls, and bean bags
- Hula hoops, buckets, bullseye box, slingshot demo, recipe cards
Session 4: Launch Day!
A friendly competition, a big-machine demo, show-and-tell, and fun awards. Then everything goes home.
Pit crew: tune-up & practice Hands-on
- Check the machines (axle, sling, pin), and fix or swap any worn parts.
- Practice launches using your “secret recipe” card. Tweak one thing at a time.
Launch Day stations (teams rotate every 10 minutes) Hands-on
- Farthest Flight: the best of 3 in the long lane, with a ping-pong ball.
- Bullseye: 3 launches at the target box. The closest to the center counts.
- Steady Eddie: 3 launches, and whose three land closest together?
- Call Your Shot: pick a target, predict the landing spot, then launch a bean bag. Closest to your prediction wins.
Keep it friendly: cheer for every launch, and adults record results on a big poster.
Snack break Break
Big-machine demo Share
- If space and weather allow (gym, playground, or a snowy field), the Berkshire Trebuchet Project team demonstrates a bigger trebuchet launching bean bags much farther.
- Kids predict the distance first, using what they learned. Then launch!
- Adults only operate the big machine. Kids watch from behind the line.
Show & Tell + Fun Awards Share
- Each team shows its machine and shares one favorite discovery (“A longer sling made ours go way farther!”).
- Hand out fun awards, one for every child (see list), plus certificates.
- Group photo with the machines (with parent permission).
Pack up & take home Share
Machines, catapults, Launch Logs, and the family note go home. Mention the Pumpkin Providing Partners program for families who want to keep going!
⏱If time allows (some classes run to 4:45): An extra Launch Day round: each team picks a target and “calls the shot” before launching.
Talk It Over
- What was your most important discovery?
- If you built another one, what would you change?
- Where else do you see levers and stored energy? (Seesaws, diving boards, bows, hammers.)
For 4th graders and first-time builders
- Run 2–3 stations instead of 4.
- Every launch “counts”. No elimination, just personal bests.
Helper tips
- One adult per station and one runs the big demo.
- Have bags or boxes ready for carrying the machines home safely.
Bring
- Results poster, awards, certificates, a camera
- The big demo trebuchet, bean bags, cones, and rope for the safety line
Printables
Workshop Launch Log (one-time workshop)
Name: ____________________
| Test | What I used | Launch 1 | Launch 2 | Launch 3 | Best! |
|---|---|---|---|---|---|
| First launches | 5 washers, ping-pong ball | ||||
| My one change | I changed: ____________ | ||||
| Target challenge | Hoop / bucket |
What made the biggest difference? ______________________________________________
My Launch Log (four-session course)
Name: ____________________ Team: ____________________
| Test | What I changed | Launch 1 | Launch 2 | Launch 3 | Best! |
|---|---|---|---|---|---|
| Session 1: lever flick | Pencil spot | ||||
| Session 2: first launch | 5 washers | ||||
| Counterweight | 3 / 5 / 7 / 10 washers | ||||
| Sling length | 4″ / 6″ / 8″ | ||||
| Release pin | Up / a little forward / more forward | ||||
| Ammo showdown | Pom-pom / ping-pong ball / bean bag | ||||
| Launch Day | My secret recipe: ___ washers, ___″ sling, pin ______ |
My favorite discovery: ______________________________________________
Fun awards (everyone gets one)
Farthest Flight · Bullseye · Steady Eddie · Clever Tweak · Wildest Idea · Best Called Shot · Master Builder · Team Spirit · Safety Star · Best Team Name · Great Question Award
Family take-home note
Dear family: your child built and tested a real (desktop-sized!) medieval trebuchet with the Berkshire Trebuchet Project. Ask them to show you how it works, and to explain their “secret recipe” (counterweight, sling length, and release pin). Please launch only ping-pong balls, bean bags, or pom-poms, and never aim at people or pets. Want to keep going? Grow a pumpkin with us this summer as a Pumpkin Providing Partner, and watch it fly at our fall Pumpkin Smash! More at berkshiretrebuchet.org · info@berkshiretrebuchet.org
Background for instructors
The science, briefly
- Lever and mechanical advantage: the arm pivots on an axle (the fulcrum). The counterweight sits on the short side and the sling on the long side. The long side travels farther in the same time, so its tip moves faster. A typical ratio is about 4:1 to 5:1.
- Energy transfer: the raised counterweight has potential energy (PE = m·g·h). As it falls, that becomes kinetic energy of the arm and then of the projectile (KE = ½·m·v²). Real machines lose a lot of it to arm motion, friction, and wobble. That’s why doubling the weight doesn’t double the distance.
- Sling: it effectively lengthens the arm and adds a whip. The release pin’s angle controls when the loop slips off, and so the launch angle.
- Projectile motion: without air, 45° gives the maximum range. With air resistance, and for light objects, the best angle is often a bit lower. Very light ammo slows quickly in air, and heavy ammo takes more energy to speed up.
- Fair tests: one variable at a time, repeated launches (things vary!), and looking at the best or middle result.
History snippets for story time
- Ancient catapults and ballistae (around 400–300 BCE, Greece and Rome) used twisted rope (torsion) to store energy. The ballista was like a giant crossbow.
- Traction trebuchets (China, around the 400s–300s BCE, later spreading west) were pulled by teams of people.
- Counterweight trebuchets appeared around the 1100s and dominated castle sieges in Europe and the Middle East. They were powerful, reliable, and could be aimed by adjusting the weight.
- “Warwolf” was a famous giant trebuchet built for King Edward I at the siege of Stirling Castle (1304).
- Gunpowder cannons replaced trebuchets in the 1400s, but the physics still shows up today in pumpkin-throwing contests!
Free resources
- TeachEngineering: Trebuchet Design & Build Challenge (free, standards-aligned)
- Science Olympiad: Trajectory event (a next step for older students)
Coming soon: grades 7–12
The same machines with more measurement: timing launches with slow-motion video to find release speed, comparing predicted range (R = v² sin 2θ / g) with measured range, estimating how much of the counterweight’s energy ends up in the ball, and designing a “Big Yard” (3–4 ft) machine as a team. Still fun, still no tests.